|
Shenzhen Alyta Industry Co.,LTD
|
Car Black Box Camera
| Payment Terms: | L/C,WU;paypal |
| Place of Origin: | Guangdong, China (Mainland) |
|
|
|
| Add to My Favorites | |
| HiSupplier Escrow |
Product Detail
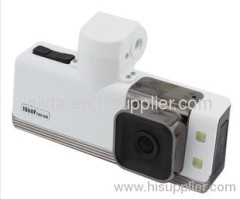
Vehicle Black box System:
1)HD Display traffic driving recorder;
2)3.5 Inch Big LCD Screen
3)Real Time & Date display on video
LCD screen size | 3.5-inch TFT screen |
Lens | 120 ultra-high definition wide-angle lens |
Video Resolution | 1280*480 |
Photo Resolution | 2560*1920 |
Video Format | AVI |
Photo Format | JPG |
Memory card format | TF Memory Card (512M-32G), high-speed card is recommended |
Recording channels | Microphones |
Out Speaker | Speaker |
Language options | English, Simplified noon, noon Traditional, Russian, Japanese, Korean |
Current Frequency | 50HZ/60HZ |
USB Interface | USB2.0 |
Vehicle charging input | 5V 1000MA |
Battery | Built-in lithium polymer battery |
Video frame rate | 10/20/30 frame |
Recording time | 2 minutes 5 minutes |
Cycle cover | Yes |


Definition of traffic recorder
Car camera Instructions
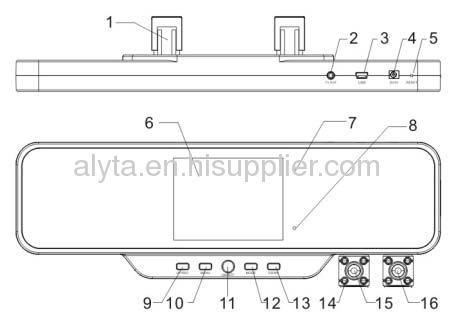
\construction
1 Fixed support 2 TV OUT 3 USB 4 DC5V IN 5 RESET 6 LCD 7 CHARGE INDICATOR 8 WORK LIGHT 9 UP/REC 10 MENU 11 ON/OFF 12 MODE 13 DOWN 14 IR LIGHT 15 LEFT CAMERA 16 RIGHT CAMERA 17 TF CARD SLOT 18SPEAKER 19 MIC1
\operation
1. startup: There are two startup methods, press ON / OFF key , DVR start recording automatically, the green light flashes; or connect with the car charger in the off state, the machine turns on directly into the video mode ,the green light flashes; unplug the car charger and save the video file after the machine automatically shut down. If TF card is not plugged in, the LCD screen displays "card error " when the machine is turned on.
2.Shutdown:pss ON / OFF button, the machine shutdown. When the lithium battery is low, DVR screen shows the battery is low, and then save the file and before it shuts down automatically.
3. video recording: the machine starts recording as it startup ,the green light flashes, press the REC / SNAP button to save the file and stop the recording, green light is on, the machine comes into standby mode; In standby mode, press the REC / SNAP button ,the machine starts recording, the green light flashes .
4.Take photographs: In standby mode, press MODE button so as to enter camera mode, press the REC / SNAP can take pictures, and can hear the horn beep
5.Playback and delete In standby mode, press MODE key twice to enter the playback mode, press the UP or DOWN to select the desired preview of the file, press REC / SNAP to play or stop other operations; If you want to delete the file, press the MENU BUTTON button Enter the delete menu, press UP or DOWN select "Run" or "give up ", then press REC / SNAP for confirmation and exit the menu to return to playback mode.
6. IR light open Camera detects the intensity of the light outside automatically, if relatively dark environment is detected, the machine starts infrared light automatically, which is easier for DVR records video under dark Under normal light environment, infrared light shut down automatically to save power Light detection is to take average light value between the front and back cameras.
7. Switch the cameras In standby or recording mode, click the UP button to switch into the working camera, the factory sets the front and rear double cameras working mode, click the UP switch to front camera work alone mode, click again to switch to rear camera work alone mode, click again to switch to both cameras work mode. In the following order cycle: dual cameras - front camera - Rear Camera - Dual camera Switch the cameras will save the last video file automatically when recording.
8. Screen rotation In standby mode, press the DOWN key could rotates the direction of the screen so that the scenes can be always observed Uprightly
In standby mode, press the MENU key to enter the menu screen, press the UP or DOWN to select the setting item, press REC / SNAP button to confirm and then enter into the function parameters setting, press the UP or DOWN to choose their specific parameters, press the REC / SNAP button to confirm , press MENU BUTTON to exit the setup menu if the setting is finished
Video Resolution: 1280 * 480
Video frame rate: Frame 10/20/30
cycle recording time: 2 minutes / 5 minutes
Recording: on or off (when you select the time off, DVR will not record)
Language: English / Simplified Chinese / Traditional Chinese / Russian /
Japanese / Korean
optical frequency settings: 50HZ/60HZ
7) Time watermark settings: Press REC / SNAP into the settings menu, press UP or DOWN button to select "Off" or "Settings", press the REC / SNAP for confirmation (confirm "off "to exit time setting, confirm the "Settings" to enter time setting interface); in time Setting interface, press UP or DOWN keys to change the date and time parameters, press REC / SNAP button to confirm the next set of parameters, when all the sets are completed, press the REC / SNAP to exit.
File storage path to move the disk break: \ DCIM \ video folder \ *. AVI or *. JPG Recording folder naming: Date
Such as: 11,042,800 Representative: April 28, 2011 file
File naming: hours, minutes and seconds. AVI, or hours,minutes and seconds. JPG Such as: 21352301.AVI Representative: 21:35:23 start recording files
Didn't find what you're looking for?
Post Buying Lead or contact
HiSupplier Customer Service Center
for help!
Related Search
Black Box
Box Camera
Camera In Box
Black Digital Camera
Black And White Camera
Black White Camera
More>>


